

Crochet wind spinner (free pattern + tutorial)
With a super easy construction based on different panels, this free crochet wind spinner pattern is playful, fast and perfect for beginner to advanced crocheters. You’ll love watching it come together in no time! Get the free pattern + video below or purchase the ad-free, printable PDF.

Wind spinners have quickly become a popular trend online, and I couldn't resist joining in by creating my own version! These spinners are surprisingly addictive to make—I ended up crafting five in less than two days! The best part? I finally got to use some cotton yarn that's been sitting in my stash for ages. If you're looking for a quick and super easy crochet project, then this one is perfect for you. Keep reading to learn how to make your own wind spinner!

As fall approaches, there’s nothing better than settling in with a crochet project that reflects the season. Imagine a wind spinner twirling in the breeze, made with simple stitches and autumn colors like red, orange, and gold. These spinners add a touch of fun to any space, moving gently with the wind and brightening up porches, gardens, or even windows indoors.
For this project, I chose the vibrant colors of sunflowers—rich yellows, deep greens, and warm browns—to bring a touch of the late summer fields into the cooler fall days. To add an extra special touch, I crocheted a small sunflower that hangs at the bottom of the spinner, making it a perfect centerpiece that catches the eye and ties the whole design together.

Whether you’re new to crochet or have years of experience, this easy pattern is a great way to bring some handmade charm to your fall décor. In this post, I’ll walk you through the steps to create your own crochet wind spinner—a piece that captures the feel of the season and adds a bit of movement wherever you hang it. So, grab your hook and fall-colored yarn, and let’s get started!

Get the brisa wind spinner
FREE PATTERN: Keep scrolling for the FREE version of the Brisa Wind Spinner + helpful video tutorial.
PRINTABLE PDF: Pick up the beautifully formatted, ad-free PDF version of the Brisa Wind Spinner from Ravelry or My Etsy Shop + you will receive THREE different version of the same pattern.
Pin it now, crochet it later!

BEGINNER CROCHET PROJECT
This could easily be your very first crochet project ever! What I love most about this wind spinner is its simplicity. All you need to know are the basic crochet stitches—single crochet, half double crochet, and double crochet—and you're all set to start. It’s the perfect project to build your confidence and create something beautiful!

Now, without further ado, let’s start making the most beautiful crochet wind spinners!
materials
You can use virtually any yarn you have at home, regardless of the material or weight, as this pattern is fully customizable. However, I recommend using cotton yarn for a sturdier and neater finish. I've chosen three different colors for an autumn-inspired palette but any colour combination will work.
You will need:
Any Worsted weight yarn (I used Friends Cotton 8/8 by Hobbii Yarns
100 % cotton; 50 g (1.75 oz) = 75 m (82 yds);
*Nougat (09)- Color A (1 ball)
* Sunflower (24)- Color B (1 ball)
*Whisky (16)- Color C (1 ball)
Paris by Drops 100 % cotton; 50 g (1.75 oz) = 75 m (82 yds)
*Rust (65) - Color D
*Forest Green (43) Color E
5 mm crochet hook or size needed to obtain gauge
Tapestry needle
Scissors and Measuring Tape
TENSION:
Tension is not crucial for this pattern. 17 dc x 6 rows= 10 x 10 cm (4 x 4 inches)
Skill Level:
Beginners
Abbreviations American terms:
Ch- Chain
Ch-sp- Chain space
St/s- Stitch/es
Beg- Beginning
Rnd- Round
RS- Right side
WS- Wrong side
Sl st- Slip stitch
Sc- Single crochet
Hdc- Half double crochet
Dc- Double crochet
Picot Stitch- 3 ch, 1 sl st in 3rd ch from hook
SIZE
One Size but I also show you can adapt the pattern to any size.
MEASUREMENTS
Length without tassel: 60 cm (23.5 inches)
Length with Tassel: 67 cm (26 inches)
Length with Sunflower: 73 cm (28.5 inches)
let’s crochet together!
CONSTRUCTION
These wind spinners are worked in one piece and in rows. The starting chain will determine the finished size of your work, so I recommend working a chain between 50 and 70 cm to achieve a nice length but if you would like a smaller spinner, just work a smaller chain (30 to 40 cm). You can embellish your project using different accessories like tassels, beads or crochet appliques. In this pattern, I will show you three different version of the same spinner.
You will start by creating a chain and a row of single crochet, after that you will work an increase row of half double crochet , followed by another increase row of double crochet and a last row for the border.

Start here...
WIND SPINNER - 1st version with Tassels
With colour A and 5 mm crochet hook
Start by making 73 ch
Row 1: 1 sc in 2nd from hook, 1 sc in each ch across, close the last sc with color B and cut colour A, 1 ch and turn. 72 sc in total

Rnd 2: (Inc) 2 hdc in each st across, close the last hdc with color C and cut color B, 2 ch and turn. 144 hdc in total
Leave a long tail of approximately 30 cm when attaching color C, to make the hanging loop.

Row 3: (Inc) 2 dc in each st across, close the last dc with color A and cut color C, 1 ch and turn. 288 dc in total
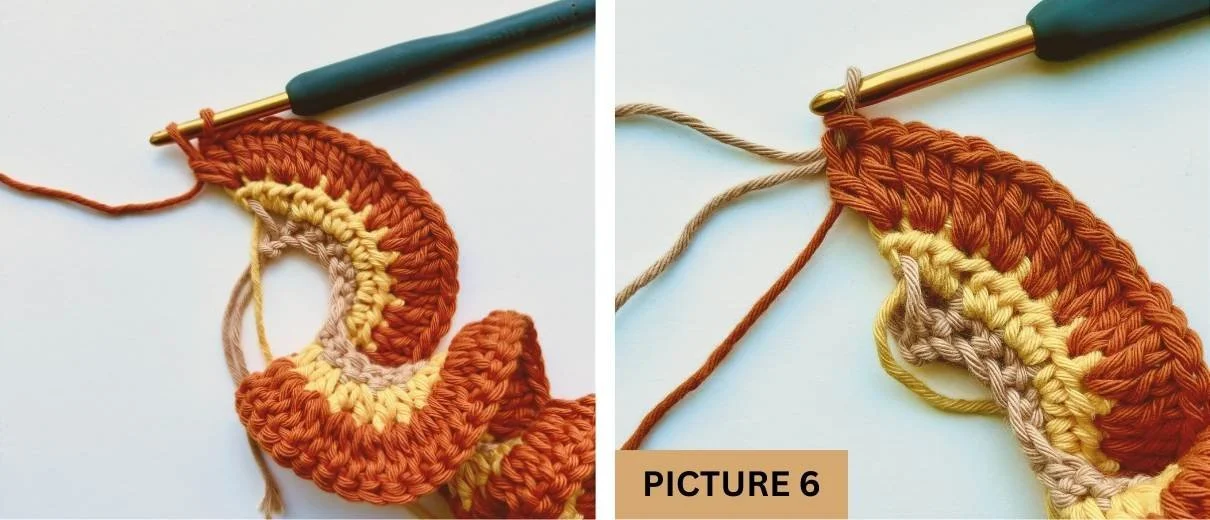
Row 4: [1 sc in next 3 sts, 1 Picot st] repeat the steps between [...] until there are 3 sts left, 1 sc in last 3 sts. Cut yarn and weave in ends.


Picture on the left shows the border worked on the 2nd version of the pattern.
Use the long thread left at the beginning of row 3 to create a loop, which can be used to hang the spinner.
MAKING THE TASSELS
Step 1: Prepare Your Yarn
Cut a piece of yarn: Start by cutting a piece of yarn about 8 inches long. This will be used to tie the top of the tassel later.
Wrap the yarn: Take your piece of cardboard (or any flat object) and begin wrapping the yarn around it. Use three strands together, one in each colour. The more you wrap, the fuller your tassel will be. Aim for 10- 20 wraps depending on the desired thickness.
Step 2: Secure the Top of the Tassel
Slide the yarn off the cardboard: Carefully slide the wrapped yarn off the cardboard, ensuring it stays together in a neat loop.
Tie the top: Take the 8-inch piece of yarn you cut earlier and tie it tightly around the top of the wrapped yarn. Make sure to double knot it to keep it secure. Leave the ends long as they will be useful for attaching the tassel later.
Step 3: Cut the Bottom of the Tassel
Cut through the loops: With the yarn bundle still intact, use your scissors to cut through the loops at the bottom of the bundle. This will create the loose ends of the tassel.
Even out the ends: If the tassel ends are uneven, trim them with your scissors to achieve a uniform length.
Step 4: Create the Tassel Head
Form the tassel head: Take another piece of yarn (about 8-10 inches long) and wrap it around the tassel, about ½ inch below the top where you tied it earlier. Wrap it several times, then tie it securely and tuck the ends inside the tassel to hide them.
Optional: Secure the head with a hook: You can use your crochet hook to pull the ends through the top of the tassel head to secure them even more firmly.
Step 5: Attach the Tassel to the Spinner
Attach to the spinner: Use the long threads from the top of the tassel to attach it to your crochet spinner. You can either sew it on or tie it securely around the desired spot.
Adjust and trim: Once attached, adjust the tassel to ensure it hangs properly, and give it a final trim if necessary.
Your crochet spinner is now ready to display with beautiful handmade tassels!

2nd Version- Reversed Single Crochet Border
Crab stitch or reverse single crochet- To start, work 1 ch and insert into the next full stitch to the right, pull up a loop, yarn over and pull through both loops on hook. First crab stitch (reverse single crochet). Continue in the same manner around your entire piece until you reach the beginning.
Work rows 1- 3 to create the spinner, change to color A, 1 ch and turn.
Row 4: 1 reverse sc or crab st in every sc from previous row. Cut yarn and weave in ends.
Create the hanging loop and add a tassel at the bottom of your spinner.

3rd Version- Sunflower Wind Spinner.
Use the following colors to make your spinner and repeat rows 1- 4 from 1st version.
Row 1: Use color D
Row 2: Use color A
Row 3: Use color B
Row 4: Use color E
Making the Sunflower:
With colour D and 4 mm crochet hook
Start by making a magic ring
Working in rounds:
Rnd 1: 2 ch (do not count as a st here and throughout) work 12 dc into the ring, pull the yarn tail to close the ring and sl st to 1st dc of rnd. 12 dc
Rnd 2: 2 ch, 2 dc in each st from previous rnd, sl st to 1st dc of round. 24 dc
Rnd 3: 2 ch [1 dc into next dc, 2 dc into next dc] 12 times, sl st to 1st dc of round. 36 dc
Cut color D and attach color B to any dc from previous rnd.
Rnd 4: 1 ch (do not count as a st), 1 sc in same space, 1 ch, *(1 dc in space between dc, 2 ch, 1 dc in space between dc), 1 ch, 1 sc in 1ch-sp from previous rnd, 1 ch * repeat from * to * 11 times in total, (1 dc in space between dc, 2 ch, 1 dc in space between dc), 1 ch, sl st to 1st sc of rnd. 12 groups of 2 dc separated by 2 ch, and 12 sc
Cut yarn and weave in ends.
Note on the Sunflowers:
If you choose to make two sunflowers as I did in this pattern, finish the first one by cutting the yarn and then proceed to make the second. However, if you prefer to make only one, leave a yarn tail of approximately 30 cm to attach it to the spinner later.
If needed, steam block your sunflowers to flatten them for a more polished look.
Next, cut a piece of yarn about 30 cm long. Using a crochet hook, attach the yarn to the third row of the spinner by creating a slipknot.
Secure the other end of the yarn to the sunflowers. Pull the hook through both sunflowers, and use it to work a slipknot, attaching them firmly to the spinner.
Finally, sew the bottom ends of the sunflowers together to ensure they are securely attached.

That was fun!! Thank you so much for following my pattern and I hope we can stay connected. Here’s how:
Share your work on Instagram or Facebook: Tag @leonela.diy or and use #leonela.diy or #dublinbaycrochet to show us your work!
Leave a comment: Say hello and share your feedback below.
Pin this post: Save this to your Pinterest crochet board so you can easily find it again.
Invitation To Our Facebook Group
Come discuss crocheting granny square bag patterns and lots of other crochet projects and techniques in our Dublin Bay Crochet Facebook group. This is only a new group but I hope you join and have fun sharing your work with this beautiful crochet community :) Come join us here.
