

Crochet a Cardigan for Beginners: Free Pattern
Blossom Cardigan Crochet Pattern – Free Tutorial
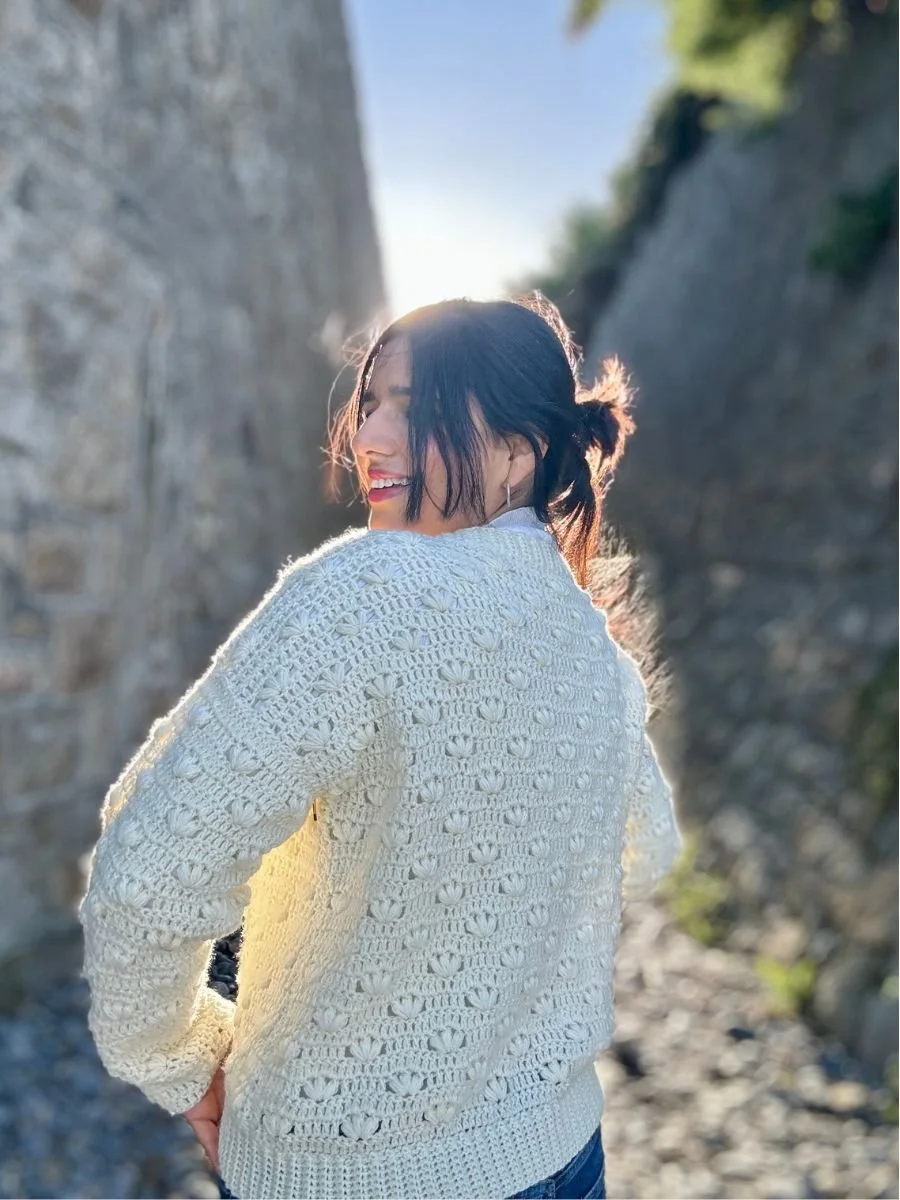
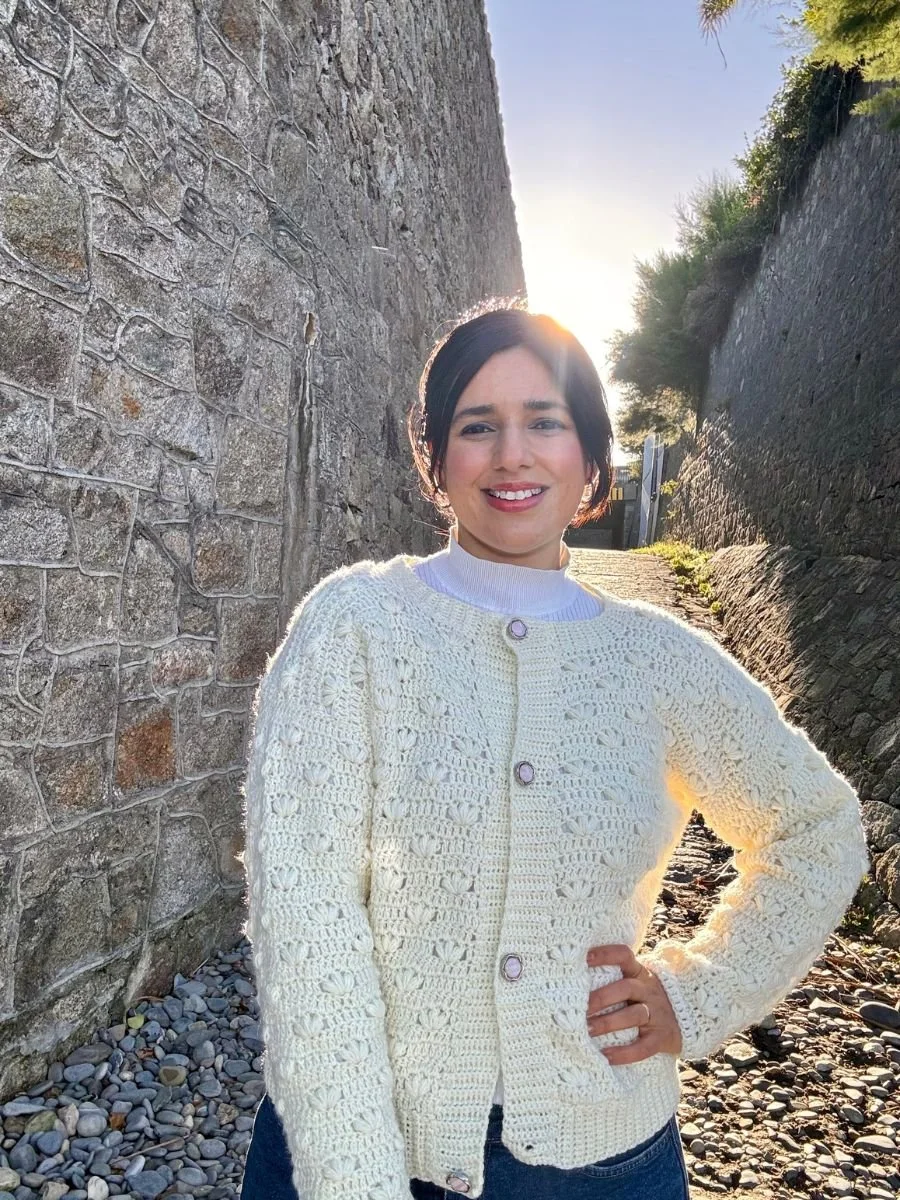
Are you looking for a cozy and stylish crochet cardigan pattern? Look no further! The Blossom Cardigan is a beginner-friendly crochet project that will keep you warm while making a fashion statement. Designed with a drop shoulder, this cardigan features elegant puff stitches, double crochets, and ribbed edging to give it a lovely textured finish.

Get the blossom Cardi
FREE PATTERN: Keep scrolling for the FREE version of the Blossom Cardi
PRINTABLE PDF: Pick up the beautifully formatted, ad-free PDF version of the Blossom Cardi from My Etsy Shop. This version comes with detailed DIAGRAMS for extra guidance.

This free tutorial will guide you through the process of crocheting the Blossom Cardigan step by step. Whether you’re new to crochet or looking to expand your skills, this cardigan is designed with you in mind. With a relaxed fit and customizable sizing, it’s perfect for layering on cool days or wearing as a standalone piece when the weather is mild. Let's dive into the details of this wonderful project!
The Inspiration Behind the Blossom Cardigan
The Blossom Cardigan was inspired by the gentle transition of the seasons. As flowers bloom and nature revives, this cardigan reflects that same renewal and beauty. The puff stitches in this design create a texture reminiscent of delicate flower petals, adding both dimension and charm to the finished piece.
The cardigan is designed to be versatile, with its loose, comfortable fit that works for various occasions—whether you're relaxing at home, out for a casual day, or meeting friends for coffee. Its classic style ensures that it can easily be paired with jeans, skirts, or even dresses, making it a wardrobe staple.

The Yarn: Soft, Durable, and Perfect for Everyday Wear
(This blog post is not sponsored by any yarn brands. The yarn was purchased by me and this is 100% my own opinion)
For this cardigan, I chose Hayfield Soft Twist DK, a blend of 90% Acrylic and 10% Merino Wool. This yarn strikes a balance between softness and durability, making it ideal for a garment that you’ll want to wear over and over again.
Why Hayfield Soft Twist DK?
Soft Texture: The acrylic and merino wool blend ensures a gentle, non-itchy feel against your skin, making it comfortable for everyday wear.
Durability: The acrylic content adds strength, so your cardigan will hold its shape wash after wash, while the merino wool gives it a luxurious softness and added warmth.
Affordable & Accessible: This yarn is budget-friendly and widely available, making it a great choice for projects that require several skeins, like a cardigan.
Yarn Details:
Yarn Weight: DK (Double Knitting)
Yardage: 325 meters (354 yards) per 100g ball
Fiber Content: 90% Acrylic, 10% Merino Wool
Colors Used: The sample is made in Ivory (251), but you can choose from a wide range of colors to personalize your cardigan.
If you can’t find Hayfield Soft Twist DK, any DK weight yarn with a similar yardage and fiber blend will work. For example: Stylecraft Special DK or Sirdar Snuggly DK are excellent alternatives.

The Design: A Perfect Balance of Texture and Simplicity
The Blossom Cardigan combines simple stitches with beautiful textured elements, making it both fun to crochet and visually interesting. The highlight of this cardigan is the puff stitch, which gives the piece a touch of elegance and a floral-like pattern throughout.
The design is perfect for beginners because it uses basic stitches—like the double crochet (dc) and the puff stitch (PS)—while introducing some creative techniques like ribbing around the edges and neckline. This allows you to practice and improve your skills while still working on a pattern that looks complex and polished.
One of the standout features of the cardigan is its drop shoulder construction. This means that the cardigan is made from five panels: two front pieces, one back piece, and two sleeves. After constructing these panels, you’ll add ribbing around the neckline and hem, giving the cardigan a neat and finished look. This design also means there’s minimal shaping involved, making it a stress-free project even for beginners.
The positive ease of the cardigan ensures a comfortable, loose fit. Positive ease refers to the difference between your body measurements and the finished garment size. For this cardigan, it’s designed to have about 14-34 cm (5.5-13 inches) of ease, so the result is a relaxed, cozy fit that feels great when layered over other clothes.

Why You’ll Love This Cardigan
Beginner-Friendly: The stitches used in this pattern are easy to learn, and the step-by-step instructions guide you through the entire process. Plus, the puff stitch adds an extra layer of creativity without being too difficult.
Customizable Fit: With six different sizes (XS to XXL), you can easily make the cardigan that fits you best. You can also adjust the length to your liking by adding or subtracting rows in the body or sleeves.
Versatile Design: The classic silhouette and elegant texture make this cardigan suitable for any occasion, whether it’s a casual day out or an evening event.
Year-Round Wear: Thanks to the DK weight yarn, this cardigan strikes the perfect balance between being lightweight and cozy. It’s great for transitional seasons like spring and fall, but also works as a layering piece in winter.

My latest video
Blossom Cardigan Details
Whether you're heading to a weekend brunch, cozying up for a movie night at home, or layering up for a crisp morning walk, the Blossom Cardigan is your go-to crochet piece for comfort and style. Featuring a relaxed, open-front design with intricate puff stitches and a ribbed neckline, this cardigan adds a touch of elegance to any outfit. The drop-shoulder construction and lightweight DK yarn make it perfect for transitioning through the seasons. Its beginner-friendly pattern ensures you’ll have a fun, stress-free project that works up beautifully, whether it’s your first cardigan or you're a seasoned crocheter. It’s versatile enough to pair with your favorite jeans or throw over a dress, and it’s so easy to make, you might find yourself creating one for each of your friends!
MATERIALS
**Disclosure: As an Amazon Associate, I want to be transparent with our readers and let you know that I may earn a small commission from qualifying purchases made through the links below.
My recommendation of these products is solely based on their suitability for the pattern and not on the commission I may receive. I have personally used and found these products to be the best option for this particular project.
Using these links greatly supports our work at Dublin Bay Crochet. We appreciate your consideration and continued support. Thank you!**
You will need:
Yarn:
Any DK yarn (I’ve used Hayfield Soft Twist DK; Double Knitting; 325m (354yds) per 100gr (3.5 oz) ball; 90% Acrylic, 10% Merino Wool)
*Ivory (251)- Yarn A- 3 (4, 4, 5, 6, 7) balls
Permissions + Copyright:
Please do not publish or share this pattern as your own. You may make items to sell with this pattern. In exchange, please link back this post. Do NOT use our photos as your own sales photos.
Abbreviations - this pattern uses American terms:
Ch- Chain
Ch-sp- Chain space
St/s- Stitch/es
Beg- Beginning
RS- Right side
WS- Wrong side
Sp/s - Space
Sc- Single crochet
Sc in BLO- Single crochet in the back loop only
Dc- Double crochet
SPECIAL STITCHES
Puff Stitch (PS): (Yarn over, insert hook in designated space and draw up loop) 4 times, yarn over and draw through 8 loops on hook
TENSION AND STITCH PATTERN
15 sts x 7 rows = 10 x 10 cm (4 x 4 inches)
Before you start working on your top, please take the time to crochet a sample using the stitch pattern below. After completing the sample, measure it to ensure that your tension matches the provided gauge. It is very important you do not skip this step as you will have time to familiarize with the stitch pattern and you can make sure your top will have the same measurements given for each size.
FOR SWATCH, chain 29.
Row 1: Starting in 3rd ch from hook, 1 dc in each st across, 2 ch and turn. 27 dc
Row 2: 1 dc in first dc, *miss 2 dc from previous row, [1 PS, 1 ch, 1 PS, 1 ch, 1 PS] into next dc, miss 2 dc, 1 dc in next 5 dc* repeat from * to * until there are 6 sts left, miss 2 dc, [1 PS, 1 ch, 1 PS, 1 ch, 1 PS] into next dc, miss 2 dc, 1 dc in last dc, 2 ch and turn. 27 sts
Row 3: 1 dc in each st across (1 dc in each 1ch-sp and each puff stitch), 2 ch and turn. 27 dc
Row 4: 1 dc in next 6 dc, *miss 2 dc, [1 PS, 1 ch, 1 PS, 1 ch, 1 PS] into next dc, miss 2 dc, 1 dc in next 5 dc* repeat from * until there is 1 dc left, 1 dc in last dc, 2 ch and turn. 27 sts
Row 5: 1 dc in each st across, 2 ch and turn. 27 dc
Rows 6 to 13: Repeat rows 2 to 5 twice.

SIZES AND MEASUREMENTS

Cardigan is designed to be worn with approx. 14-34 cm (5.5/ 13 inches) of positive ease. When choosing a size, find the bust measurement in this chart that equals approx. 14-34 cm (5.5/ 13 inches) inches larger than your actual bust measurement and make this size. For example, model has 93 cm bust and is wearing a size M with finished bust measurement of 116 cm
SOME NOTES ON THE PATTERN
SIZING
This cardigan is written in 6 different sizes as follows: XS (S, M, L, XL, XXL). Make sure to follow the number for your size only. It is recommended that you go through the pattern and highlight numbers pertaining to your size before beginning.
CONSTRUCTION
The cardigan is a drop shoulder design, comprising 5 panels: 2 fronts + 1 back + 2 sleeves. After the cardigan has been constructed, you will work a ribbing around the neckline and bottom of the cardigan. As an optional step, you can add buttons.
ADJUSTMENTS
You can make your cardigan longer or shorter. Add or subtract rows to the front and back panels before decreasing for the neckline.
STITCH PATTERN
In this pattern, the initial 2 ch does not count as a stitch, so you should do a double crochet on that space where the initial ch begins. However, when making the increases on the sleeves, 3 ch does count as 1st double crochet. Each puff stitch and chain worked on even rows will count as one stitch each on the next row, so you should do a double crochet in each chain space and puff stitch.
START HERE
BACK PANEL
c
Row 4: 1 dc in next 6 dc, *miss 2 dc, [1 PS, 1 ch, 1 PS, 1 ch, 1 PS] into next dc, miss 2 dc, 1 dc in next 5 dc* repeat from * until there is 1 dc left, 1 dc in last dc, 2 ch and turn. 67 (77, 87, 97, 107, 117) sts
Row 5: 1 dc in each st across, 2 ch and turn. 67 (77, 87, 97, 107, 117) dc
Rows 6 – 33 (33, 35, 35, 37, 37): Repeat rows 2-5. 67 (77, 87, 97, 107, 117) sts
Cut yarn and weave in ends.

LEFT FRONT PANEL:
Using 5mm hook and colour A, chain 29 (29, 39, 39, 49, 49)
Row 1 (WS): Starting in 3rd ch from hook, 1 dc in each ch across, turn. 27 (27, 37, 37, 47, 47) dc
Row 2 (RS): 1 dc in first dc, *miss 2 dc from previous row, [1 PS, 1 ch, 1 PS, 1 ch, 1 PS] into next dc, miss 2 dc, 1 dc in next 5 dc* repeat from * until there are 6 sts left, miss 2 dc, [1 PS, 1 ch, 1 PS, 1 ch, 1 PS] into next dc, miss 2 dc, 1 dc in last dc, 2 ch and turn. 27 (27, 37, 37, 47, 47) sts
Row 3: 1 dc in each st across, 2 ch and turn. 27 (27, 37, 37, 47, 47) dc
Row 4: 1 dc in next 6 dc, *miss 2 dc, [1 PS, 1 ch, 1 PS, 1 ch, 1 PS] into next dc, miss 2 dc, 1 dc in next 5 dc* repeat from * until there is 1 dc left, 1 dc in last dc, 2 ch and turn. 27 (27, 37, 37, 47, 47) sts
Row 5: 1 dc in each st across, turn. 27 (27, 37, 37, 47, 47) dc
Rows 6 to 29 (29, 31, 31, 33, 33): Repeat rows 2 to 5.
Sizes XS and S ONLY
Row 30: 1 dc in first dc, *miss 2 dc from previous row, [1 PS, 1 ch, 1 PS, 1 ch, 1 PS] into next dc, miss 2 dc, 1 dc in next 5 dc, miss 2 dc, [1 PS, 1 ch, 1 PS, 1 ch, 1 PS] into next dc, miss 2 dc, 1 dc in next dc, leaving the rest of the sts unworked, 2 ch and turn. 17 sts in total
Row 31: 1 dc in each st across, 2 ch and turn. 17 dc
Row 32: 1 dc in next 6 dc, *miss 2 dc, [1 PS, 1 ch, 1 PS, 1 ch, 1 PS] into next dc, miss 2 dc, 1 dc in next 6 dc, 2 ch and turn. 17 sts
Row 33: 1 dc in each st across. Cut yarn leaving approximately 30 cm left to sew the sides together. 17 dc
Sizes M and L ONLY
Row 32: 1 dc in next 6 dc, *miss 2 dc, [1 PS, 1 ch, 1 PS, 1 ch, 1 PS] into next dc, miss 2 dc, 1 dc in next 5 dc* repeat from * to * one more time, 1 dc in next dc, leaving the rest of the sts unworked, 2 ch and turn. 27 sts in total
Row 33: 1 dc in each st across, 2 ch and turn. 27 dc
Row 34: 1 dc in first dc, *miss 2 dc from previous row, [1 PS, 1 ch, 1 PS, 1 ch, 1 PS] into next dc, miss 2 dc, 1 dc in next 5 dc* repeat from * until there are 6 sts left, miss 2 dc, [1 PS, 1 ch, 1 PS, 1 ch, 1 PS] into next dc, miss 2 dc, 1 dc in last dc, 2 ch and turn. 27 sts
Row 35: 1 dc in each st across, 2 ch and turn. Cut yarn and weave in ends. 27 dc
Sizes XL and XXL ONLY
Row 34: 1 dc in first dc, *miss 2 dc from previous row, [1 PS, 1 ch, 1 PS, 1 ch, 1 PS] into next dc, miss 2 dc, 1 dc in next 5 dc* repeat from * to * 3 times in total, miss 2 dc, [1 PS, 1 ch, 1 PS, 1 ch, 1 PS] into next dc, miss 2 dc, 1 dc in next dc, 2 ch and turn, leaving the remaining sts unworked. 37 sts
Row 35: 1 dc in each st across, 2 ch and turn. 37 dc
Row 36: 1 dc in next 6 dc, *miss 2 dc, [1 PS, 1 ch, 1 PS, 1 ch, 1 PS] into next dc, miss 2 dc, 1 dc in next 5 dc* repeat from * until there is 1 dc left, 1 dc in last dc, 2 ch and turn. 37 sts
Row 37: 1 dc in each st across. Cut yarn leaving approximately 30 cm left to sew the sides together. 37 dc
RIGHT FRONT PANEL
Using 5mm hook and colour A, chain 29 (29, 39, 39, 49, 49)
Repeat rows 1 to 29 (29, 31, 31, 33, 33) from left front panel. Cut yarn.
With the RS of your work facing you and starting on the right side of the panel count 10 sts.
Attach yarn on 11th dc and work 2 ch.
Sizes XS and S only
Row 30: 1 dc in first dc, miss 2 dc from previous row, [1 PS, 1 ch, 1 PS, 1 ch, 1 PS] into next dc, miss 2 dc, 1 dc in next 5 dc, miss 2 dc, [1 PS, 1 ch, 1 PS, 1 ch, 1 PS] into next dc, miss 2 dc, 1 dc in last dc, 2 ch and turn. 17 sts
Row 31: 1 dc in each st across, 2 ch and turn. 17 dc
Row 32: 1 dc in next 6 dc, miss 2 dc, [1 PS, 1 ch, 1 PS, 1 ch, 1 PS] into next dc, miss 2 dc, 1 dc in next 6 dc, 2 ch and turn.
Row 33: 1 dc in each st across. Cut yarn leaving approximately 30 cm left to sew the sides together. 17 dc
Sizes M and L ONLY
Row 32: 1 dc in next 6 dc, *miss 2 dc, [1 PS, 1 ch, 1 PS, 1 ch, 1 PS] into next dc, miss 2 dc, 1 dc in next 5 dc* repeat from * to * one more time, 1 dc in last dc, 2 ch and turn. 27 sts
Row 33: 1 dc in each st across, 2 ch and turn. 27 dc
Row 34: 1 dc in first dc, *miss 2 dc from previous row, [1 PS, 1 ch, 1 PS, 1 ch, 1 PS] into next dc, miss 2 dc, 1 dc in next 5 dc* repeat from * until there are 6 sts left, miss 2 dc, [1 PS, 1 ch, 1 PS, 1 ch, 1 PS] into next dc, miss 2 dc, 1 dc in last dc, 2 ch and turn. 27 sts
Row 35: 1 dc in each st across. Cut yarn leaving approximately 30 cm left to sew the sides together. 27 dc
Sizes XL and XXL only
Row 34: 1 dc in first dc, *miss 2 dc from previous row, [1 PS, 1 ch, 1 PS, 1 ch, 1 PS] into next dc, miss 2 dc, 1 dc in next 5 dc*, repeat from * to * until there are 6 sts left, miss 2 dc, [1 PS, 1 ch, 1 PS, 1 ch, 1 PS] into next dc, miss 2 dc, 1 dc in last dc, 2 ch and turn. 37 sts
Row 35: 1 dc in each st across, 2 ch and turn. 37 dc
Row 36: 1 dc in next 6 dc, *miss 2 dc, [1 PS, 1 ch, 1 PS, 1 ch, 1 PS] into next dc, miss 2 dc, 1 dc in next 5 dc* repeat from * to * until there is 1 dc left, 1 dc in last dc, 2 ch and turn. 37 sts
Row 37: 1 dc in each st across. Cut yarn leaving approximately 30 cm left to sew the sides together. 37 dc

SLEEVES -Make 2
Sizes XS (S, M, L) ONLY
Using 5mm hook and colour A.
Chain 39 (39, 39, 39)
Row 1 (WS): Starting in 3rd ch from hook, 1 dc in each ch across, 2 ch and turn. 37 dc
Row 2 (RS): 1 dc in 1st dc, *miss 2 dc, [1 PS, 1 ch, 1 PS, 1 Ch, 1 PS] into next dc, miss 2 dc, 1 dc in next 5 dc * repeat from * to * until last 6 sts, miss 2 dc [1 PS, 1 ch, 1 PS, 1 ch, 1 PS] into next dc, miss 2 dc, 1 dc in last dc, 3 ch and turn. 37 sts
Row 3: (Inc) 1 dc in same space of initial 3 ch, 1 dc in each st across to last sts, 2 dc in last dc, 2 ch and turn. 39 dc
Row 4: 1 dc in next 7 dc, *miss 2 dc, [1 PS, 1 ch, 1 PS, 1 ch, 1 PS] into next dc, miss 2 dc, 1 dc in next 5 dc * repeat from * until 2 last dc, 1 dc in last 2 dc, 3 ch and turn. 39 sts
Row 5: (Inc) 1 dc in same space of initial 3 ch, 1 dc in each st across to last sts, 2 dc in last dc, turn. 41 dc
Row 6: 1 dc in next 3 dc, *miss 2 dc, [1 PS, 1 ch, 1 PS, 1 ch, 1 PS] into next dc, miss 2 dc, *1 dc in next 5 dc, miss 2 dc, [1 PS, 1 ch, 1 PS, 1 ch, 1 PS] into next dc, miss 2 dc * repeat from to last 3 dc, 1 dc in last 3 dc, 3 ch and turn. 41 sts.
Row 7: (Inc) 1 dc in same space of initial 3 ch, 1 dc in each st across to last sts, 2 dc in last dc, 2 ch and turn. 43 dc
Row 8: 1 dc in next 9 dc, *miss 2 dc, [1 PS, 1 ch, 1 PS, 1 ch, 1 PS] into next dc, miss 2 dc, 1 dc in next 5 dc * repeat until there are 4 sts left, 1 dc in last 4 dc, 3 ch and turn. 43 sts
Row 9: (Inc) 1 dc in same space of initial 3 ch, 1 dc in each st across to last sts, 2 dc in last dc, 2 ch and turn. 45 dc
Row 10: 1 dc in next 5 dc, *miss 2 dc, [1 PS, 1 ch, 1 PS, 1 ch, 1 PS] into next dc, miss 2 dc, 1 dc in next 5 dc * repeat from until the end of the row, 3 ch and turn. 45 sts
Row 11: (Inc) 1 dc in same space of initial 3 ch, 1 dc in each st across to last sts, 2 dc in last dc, turn. 47 dc
Rows 12 to 21: Repeat rows 2-11. At the end of row 21 you should have 57 dc.
This is the end of increases for sizes XS and S. Go to row 22 for sizes M and L.
SIZES XS AND S ONLY
Row 22: 1 dc in first dc, *miss 2 dc from previous row, [1 PS, 1 ch, 1 PS, 1 ch, 1 PS] into next dc, miss 2 dc, 1 dc in next 5 dc* repeat from * until there are 6 sts left, miss 2 dc, [1 PS, 1 ch, 1 PS, 1 ch, 1 PS] into next dc, miss 2 dc, 1 dc in last dc, 2 ch and turn. 57 sts in total
Row 23: 1 dc in each st across, 2 ch and turn. 57 dc
Row 24: 1 dc in next 6 dc, *miss 2 dc, [1 PS, 1 ch, 1 PS, 1 ch, 1 PS] into next dc, miss 2 dc, 1 dc in next 5 dc* repeat from * until there is 1 dc left, 1 dc in last dc, 2 ch and turn. 57 sts
Row 25: 1 dc in each st across, 2 ch and turn. 57 dc
Row 26 to 29: Repeat rows 22 to 25 one time. 57 dc.
Cut yarn leaving approximately 30 cm left to sew the sides together.
SIZES M AND L ONLY
Rows 22- 28: Repeat rows 2-8. At the end of row 30 you should have 63 dc.
Row 29: 1 dc in each st across, 2 ch and turn. 63 dc
Row 30: 1 dc in next 4 dc, *miss 2 dc, [1 PS, 1 ch, 1 PS, 1 ch, 1 PS] into next dc, miss 2 dc, 1 dc in next 5 dc * repeat from * to * until there are 9 dc left, miss 2 dc, [1 PS, 1 ch, 1 PS, 1 ch, 1 PS] into next dc, miss 2 dc, 1 dc in next 4 dc, 2 ch and turn. 63 sts
Row 31: 1 dc in each st across. Cut yarn leaving approximately 30 cm left to sew the sides together. 63 dc
Sizes XL and XXL
Chain 41
Row 1 (WS): Starting in 3rd ch from hook, 1 dc in each ch across, 2 ch and turn. 39 dc
Row 2 (RS): 1 dc in next 7 dc, *miss 2 dc, [1 PS, 1 ch, 1 PS, 1 ch, 1 PS] into next dc, miss 2 dc, 1 dc in next 5 dc * repeat from * to * until there are 2 dc left, 1 dc in last 2 dc, 3 ch and turn. 39 sts
Row 3: (Inc) 1 dc in same space of initial 3 ch, 1 dc in each st across to last st, 2 dc in last dc, 2 ch and turn. 41 dc
Row 4: 1 dc in next 3 dc, miss 2 dc, [1 PS, 1 ch, 1 PS, 1 ch, 1 PS] into next dc, miss 2 dc, *1 dc in next 5 dc, miss 2 dc, [1 PS, 1 ch, 1 PS, 1 ch, 1 PS] into next dc, miss 2 dc * repeat from * to * until there are 3 dc left, 1 dc in last 3 dc, 3 ch and turn. 41 sts
Row 5: (Inc) 3 ch, 1 dc in same space of initial 3 ch, 1 dc in each st across to last st, 2 dc in last dc, 2 ch and turn. 43 dc
Row 6: 1 dc in next 9 dc, *miss 2 dc, [1 PS, 1 ch, 1 PS, 1 ch, 1 PS] into next dc, miss 2 dc, 1 dc in next 5 dc * repeat from * to * until there are 4 sts left, 1 dc in last 4 dc, 3 ch and turn. 43 sts
Row 7: (Inc) 1 dc in same space of initial 3 ch, 1 dc in each st across to last st, 2 dc in last dc, 2 ch and turn. 45 dc
Row 8: 1 dc in next 5 dc, *miss 2 dc, [1 PS, 1 ch, 1 PS, 1 ch, 1 PS] into next dc, miss 2 dc, 1 dc in next 5 dc * repeat from * to * until the end of the row, 3 ch and turn. 45 sts
Row 9: (Inc) 1 dc in same space of initial 3 ch, 1 dc in each st across to last st, 2 dc in last dc, 2 ch turn. 47 dc
Row 10: 1 dc in 1st dc, *miss 2 dc, [1 PS, 1 ch, 1 PS, 1 Ch, 1 PS] into next dc, miss 2 dc, 1 dc in next 5 dc* repeat from * to * until there 6 sts left, miss 2 dc [1 PS, 1 ch, 1 PS, 1 ch, 1 PS] into next dc, miss 2 dc, 1 dc in last dc, 3 ch and turn. 47 sts
Row 11: (Inc) 1 dc in same space of initial 3 ch, 1 dc in each st across to last st, 2 dc in last dc, turn. 49 dc
Row 12- 21: Repeat rows 2-11. At the end of row 21 you should have 59 sts
Row 22- 31: Repeat rows 2- 11. At the end of row 31 you should have 69 sts
Row 32: Repeat row 2. 69 sts
Row 33: 1 dc in each st across. Cut yarn leaving approximately 30 cm left to sew the sides together. 69 dc
Assembly
Place your front panel on top of our back panel with the right sides touching. Using a yarn needle and colour A, whip stitch along shoulder seams. Repeat this once more to attach the second panel.
Fold your first sleeve in half so the long edges meet, and locate the centre point at the top edge-, line this up with the shoulder seam of the body so the right sides are together.
Use colour A and whip stitch to attach the sleeve to the body.
Repeat steps 2 and 3 for the other sleeve.
Fold the cardigan along the shoulder edge so that the wrong sides are touching and sew the underarm and side seams using colour A and a tapestry needle.

Neckline Ribbing
With the RS of the cardigan facing you, attach yarn to top corner space of right side panel. (see picture 1)
With 4mm crochet hook
Row 1: 7 ch (see picture 2) 1 sc in second ch from hook and in each ch to end (6 sc) (see picture 3), sl st in same space where the yarn was attached (see picture 3), 1 sl st in next space on neckine edge (see picture 4), turn. 6 sc

Row 2: Miss 2 sl sts from previous row, 1 sc in BLO in each sc to end, 1 ch, turn. 6 sc (See picture 5)
Row 3: 1 sc in BLO in each sc to end, miss 2 sl st from previous row, 1 sl st in next 2 spaces of bottom edge, turn. 6 sc (See pictures 6 and 7)
Repeat rows 2-3 until entire neckline is covered.
Fasten off and weave in ends.

Bottom Ribbing
With 5mm crochet hook and colour B, attach yarn to bottom edge and work 11 ch.
Follow the same steps for the neckline ribbing and work as many rows as necessary to cover the bottom of your cardigan. You should have 10 sc at the end of each row.
Right Side Edging
With the RS of your cardigan facing you, attach yarn at bottom hem of Right Front Panel.
With 5 mm crochet hook.
Work 10 ch and repeat the same steps for the Neckline Ribbing. You will have 9 sc in total.
After completing the ribbing, evenly distribute 4 buttons along the front edge of the cardigan. Place one button at the top and another at the very bottom. Next, position the remaining two buttons in between, ensuring the spacing between each button is proportional for a balanced look.
Left Side Edging and Buttonholes
For the opposite side of the cardigan, you’ll create buttonholes as you work the ribbing. Place the buttonholes at the same positions where you plan to sew the buttons on the other side. Follow these steps:
With the right side of your cardigan facing you, attach the yarn to the top of the neckline on the Left Front Panel.
With 5 mm crochet hook.
Work 10 ch and repeat the same steps for the Neckline Ribbing. You will have 9 sc in total.
Work Ribbing Until Buttonhole Placement: Begin working your ribbing until you reach the position for the first buttonhole. You will work 1 row of the ribbing for all sizes to make sure the 1st button hole is at the top.
2nd Row (Buttonhole Placement): Work 1 sc in BLO) in the first 4 sts, miss 1 st, and chain 3 to form the buttonhole, 1 sc in BLO in the next 4 sts (this completes the buttonhole for the top button.
Continue Ribbing: In the next row, when you reach the buttonhole, work 1 sc into each of the 3 chain spaces to complete the buttonhole.
Remaining Buttonholes: Continue working the ribbing, evenly spacing the next 3 buttonholes as you proceed. The placement should align with the buttons on the opposite side.
Finish the Ribbing: Once all the buttonholes are placed and the ribbing is complete, fasten off and weave in the ends.
CONGRATULATIONS! YOU MADE YOUR OWN CROCHET CARDIGAN! :)
That was fun!! Thank you so much for following my pattern and I hope we can stay connected. Here’s how:
Share your work on Instagram or Facebook: Tag @leonela.diy or and use #leonela.diy or #dublinbaycrochet to show us your work!
Leave a comment: Say hello and share your feedback below.
Pin this post: Save this to your Pinterest crochet board so you can easily find it again.
Invitation To Our Facebook Group
Come discuss crocheting granny square bag patterns and lots of other crochet projects and techniques in our Dublin Bay Crochet Facebook group. This is only a new group but I hope you join and have fun sharing your work with this beautiful crochet community :) Come join us here.
