

Crochet Top For Summer: Free Crochet Pattern
**You can purchase an INEXPENSIVE AD-FREE PDF of this pattern on Etsy HERE . This beautifully formatted PDF includes the step-by-step instructions and is a total of 17 pages including the cover page. Thank you so much for supporting my work :)
Welcome to the Bluebell Top Crochet pattern, your go-to guide for creating the perfect light and lacy summer top that seamlessly blends trendiness with comfort.

Summer is here, and it's the perfect time to bring out your crochett hooks and create something light, airy, and fabulous! Today, I'm so excited to share with you a free crochet pattern for a beautiful summer top that is perfect for all skill levels, .
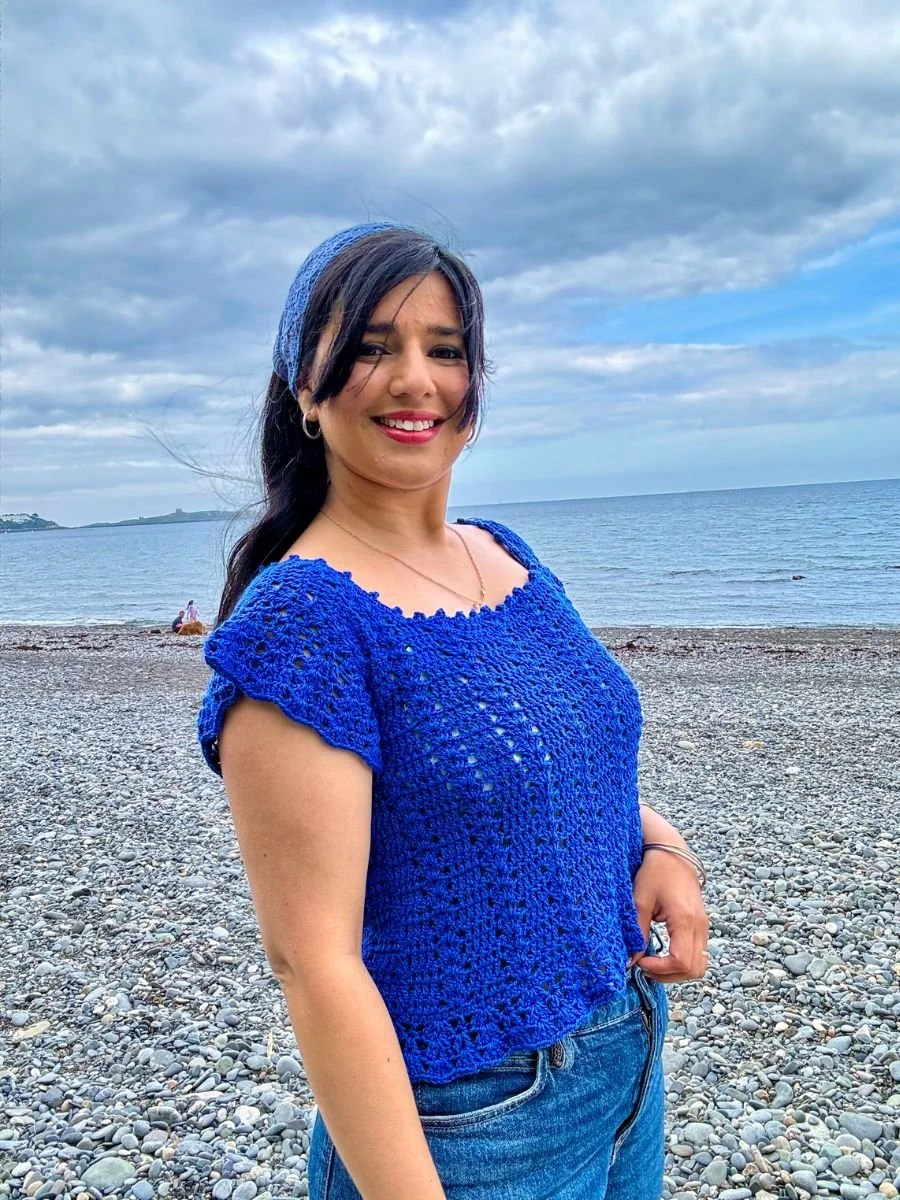
This crochet summer top is not only stylish but also designed to keep you cool and comfortable during those warm days. For the first sample, I’ve used this vibrant blue colour that is refreshing and ideal for the season, and the open stitch pattern makes it wonderfully breezy. The delicate cap sleeves add a charming touch, while the slightly cropped length pairs perfectly with high-waisted jeans or skirts.

What makes this top truly special is its versatility. It's elegant enough to wear to a casual summer gathering, yet still casual and comfortable for a day at the beach or lounging around. The intricate stitch design adds a touch of sophistication, making it a unique piece that stands out in your summer wardrobe.
This pattern is simple and straightforward, making it an excellent project for anyone new to crocheting or looking for a relaxing and enjoyable craft. With its easy-to-follow instructions, you'll have your new top ready in no time. Believe it or not, I made it in a weekend! :)

I also wanted to share this picture when I visited one of favourite yarn shop in London!! And the weather was perfect to wear my new summer top :) I had so much fun visiting the shop and I was so happy I was wearing something I’ve created myself. And I couldn’t leave the shop empty handed!

Whether you're heading to the beach, attending a casual summer gathering, or just lounging around, this top is the perfect addition to your summer wardrobe. Its lightweight feel ensures you'll stay cool, while the lovely texture and fit will make you look effortlessly chic.
So, grab your yarn and hook, and let's get started on this delightful summer crochet adventure. Happy crocheting!
PRINT AND CROCHET OFFLINE!
Love to crochet on the couch? You can always find a low-cost printable PDF version of all my free patterns. Perfect for printing out or viewing offline on your tablet or phone.This beautifully formatted PDF includes the step-by-step pictures and stitch diagrams for each element of the garland and is a total of 15 pages. I’ve also included a print-friendly version of the pattern so it is easier and cheaper to print! The printable pdf is a super useful upgrade that makes it even easier to crochet.
video tutorial
materials
Any dk or sport weight yarn can be used, however I highly recommend using natural fibers such as bamboo, silk, cotton, or linen, as they provide a lovely drape that compliments the flouncy sleeves and trim along the bottom of the top.
You will need:
Any DK yarn (I’ve used Hobbii Acacia, 51% acrylic, 49% cotton; 100 g (3.5 oz) = 250 m (273 yds) for the light- blue sample
Friends Cotton Silk, 77% Cotton, 23% Silk; 50 g (1.75 oz) = 120 m (131 yds) for the royal blue sample.
*2 (3, 3, 4, 4, 5) skeins of Hobbii Acacia - Light- Blue (04)- Colour A
*4 (4, 5, 6, 7, 8) skeins of Friends Cotton Silk - Sapphire (85)- Colour A
5 mm crochet hook or size needed to obtain gauge.
Tapestry needle,
Scissors and Measuring Tape.
pattern notes
SIZING
This summer top is written in 6 different sizes as follows: XS (S, M, L, XL, XXL). Make sure to follow the instructions for your size only. It is recommended that you go through the pattern and highlight the numbers pertaining to your size before beginning.
CONSTRUCTION
This design is worked in two panels: Front and Back. These two panels are then joined together, and the sleeves are worked directly into the top. A ruffle bottom edge is then worked, finishing with a picot trim across the neckline.
get the bluebell summer top
FREE PATTERN: Keep scrolling for the FREE version of the BLUEBELL SUMMER TOP + helpful tutorial video.
PRINTABLE PDF: Pick up the beautifully formatted, ad-free PDF version of the Bluebell Summer Top that comes in sizes in six sizes XS (S, M, L, XL, XXL) and as an extra BONUS: instructions to adjust the pattern to fit your own measurements from ETSY or DublinBayCrochet.com
Abbreviations:
Pattern is written using American terms:
Ch- Chain
Ch-sp- Chain space
St/s- Stitch/es
Beg- Beginning
Rnd- Round
RS- Right side
WS- Wrong side
Sc- Single crochet
Dc- Double crochet
Dc2tog- Double crochet two stitches together
Special Stitches:
V-stitch: (1 dc +1 ch+ 1 dc) in same space.
SHELL: (2 dc+ 1 ch, 2 dc) in same space.
Picot Stitch: 3 ch, 1 sl st at base of sc.
NOTE: 2 ch at the beginning of each row does NOT count as a stitch.
Stitch Pattern + SAMPLE
Before you start working on your top, please take the time crochet a sample using the
stitch pattern below. After you finish, measure your sample and make sure it matches my
tension. It is very important you do not skip this step as you will have time to familiarize
with the stitch pattern and you can make sure your top will have the same measurements
given for each size.
FOR SWATCH, chain 24.
Row 1: Starting in 3rd ch from hook, *1 dc in next 4 ch**, miss 2 ch, SHELL in next ch, miss 2 ch* repeat from * to * ending last repeat at **, 2 ch and turn. There are 2 SHELLS at the end of the row.
Row 2: *1 dc in next 4 sts**, Cluster V-st in 1ch-sp from previous Cluster V-st* repeat from * to * ending last repeat at **, 2 ch and turn.
Rows 3 to 10: Repeat row 2
Tension /Gauge sample

Number of Stitches
There are 17 sts in 10 cm (4 inches) as shown in the picture. The SHELL counts as 1 st and there are 2 sts before and after the SHELL (these will be the 2 dc before and after the ch-sp of the SHELL.
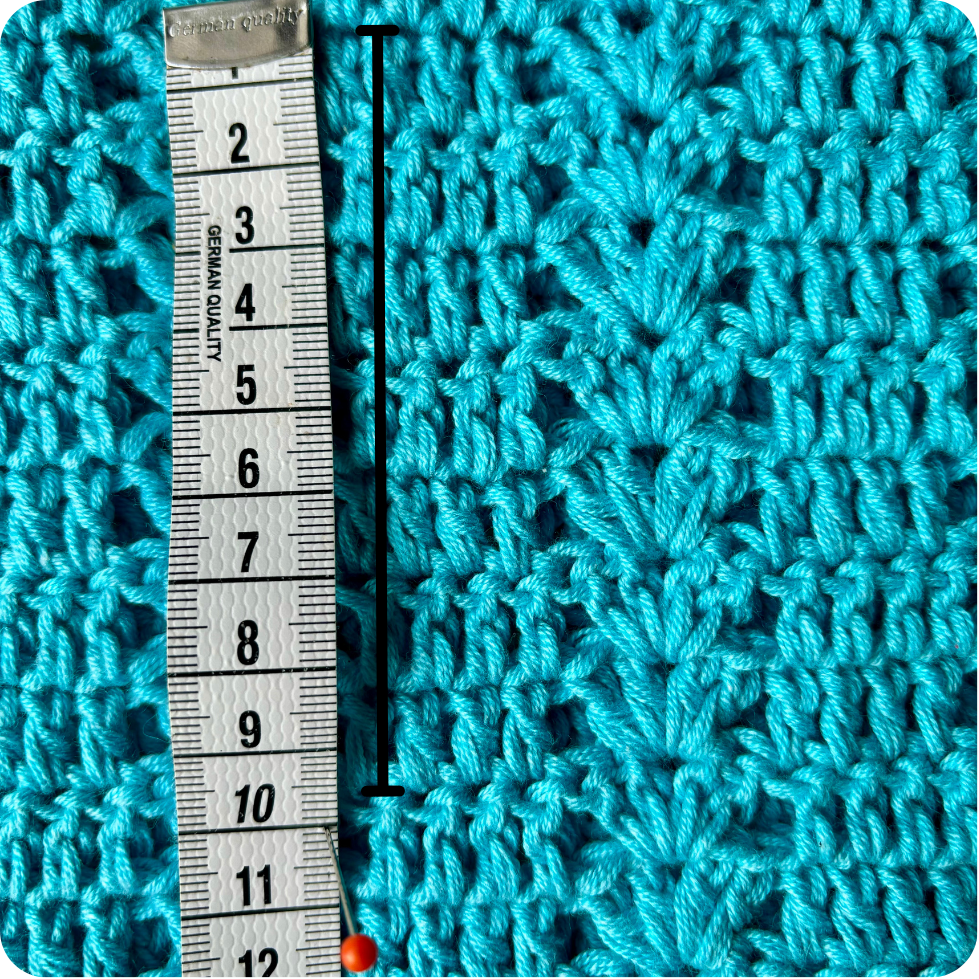
Number of Rows
There are 7 rows in 10 cm (4 inches) as shown in the picture above.
Sizes and Measurements
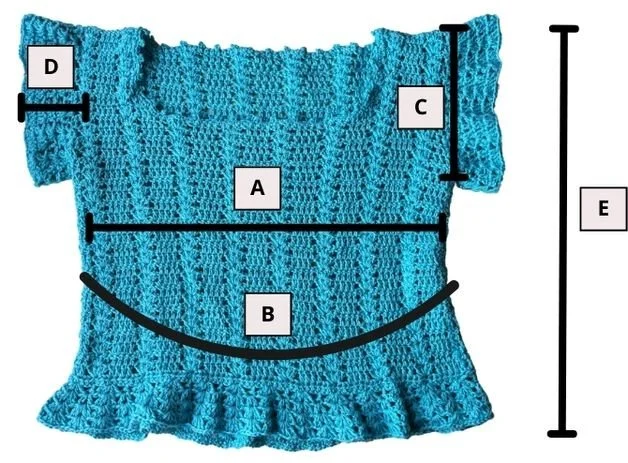
TOP is designed to be worn with approx. 1 to 4.5 cm/ 0.5 to 4.5 inches of negative ease. When choosing a size, find the bust measurement in this chart that equals approx. 1 to 4.5 cm/ 0.5 to 4.5 inches smaller than your actual bust measurement and make this size. For example, model has 92 cm/ 36 inches bust and is wearing a size M with finished bust measurement of 90 cm/ 35 inches.


Make it stand out
This is the second sample I’ve crocheted using this beautiful light-blue. And I can’t wait to make it in another colour :)
Permissions + Copyright:
Please do not publish or share this pattern as your own. You may make items to sell with this pattern. In exchange, please link back this post. Do NOT use our photos as your own sales photos.
START HERE
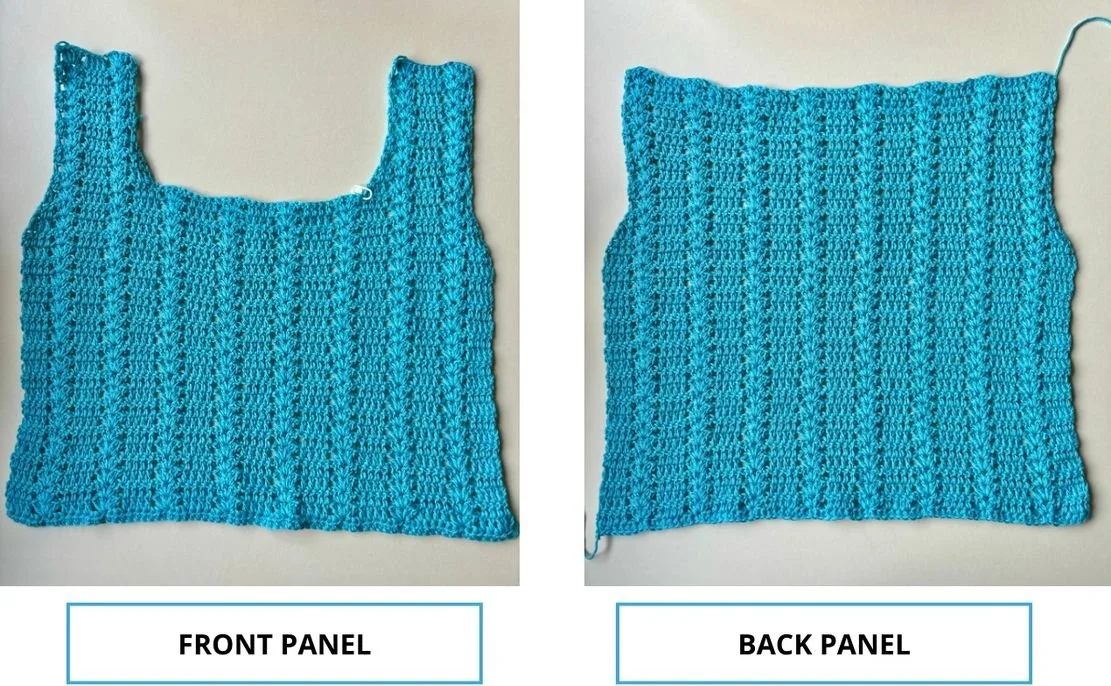
FRONT PANEL
Using 5 mm hook and your favourite DK yarn
Chain 60 (69, 78, 87, 96, 105)
Row 1: Starting in 3rd ch from hook, *1 dc in next 4 ch**, miss 2 ch, SHELL in next ch, miss 2 ch* repeat from * to * ending last repeat at **, 2 ch and turn. There are 6 (7, 8, 9, 10, 11) SHELLS at the end of the row.
Row 2: *1 dc in next 4 sts**, SHELL in ch-sp from previous SHELL* repeat from * to * ending last repeat at **, 2 ch and turn.
Rows 3 to 18: Repeat Row 2
Shaping the armholes:
Row 21: (Dec) Miss 1st st (this is the the st where the initial 2 ch is placed), 1 dc in next 3 sts, SHELL in next ch-sp from previous SHELL, * 1 dc in next 4 sts, SHELL in ch-sp from previous SHELL* repeat from * to * until there 4 dc left, 1 dc in next 2 dc, 1 dc2tog over last 2 dc, 2 ch and turn. There are 3 dc at the beg and the end of the row.
Row 22: (Dec) Miss 1st st (this is the the st where the initial 2 ch is placed), 1 dc in next 2 sts, SHELL in next ch-sp from previous SHELL, * 1 dc in next 4 sts, SHELL in ch-sp from previous SHELL* repeat from * to * until there 3 dc left, 1 dc in next dc, 1 dc2tog over last 2 dc, 2 ch and turn. There are 2 dc at the beg and the end of the row.
Row 23: (Dec) Miss 1st st (this is the the st where the initial 2 ch is placed), 1 dc in next dc, SHELL in next ch-sp from previous SHELL, * 1 dc in next 4 sts, SHELL in ch-sp from previous SHELL* repeat from * to * until there 2 dc left, 1 dc2tog over last 2 dc, 2 ch and turn. There is 1 dc at the beg and the end of the row.
Row 24: 1 dc in 1st dc from row, SHELL in next ch-sp from previous SHELL, * 1 dc in next 4 sts, SHELL in ch-sp from previous SHELL* repeat from * to * until there is 1 dc left, 1 dc in last dc, 2 ch and turn.
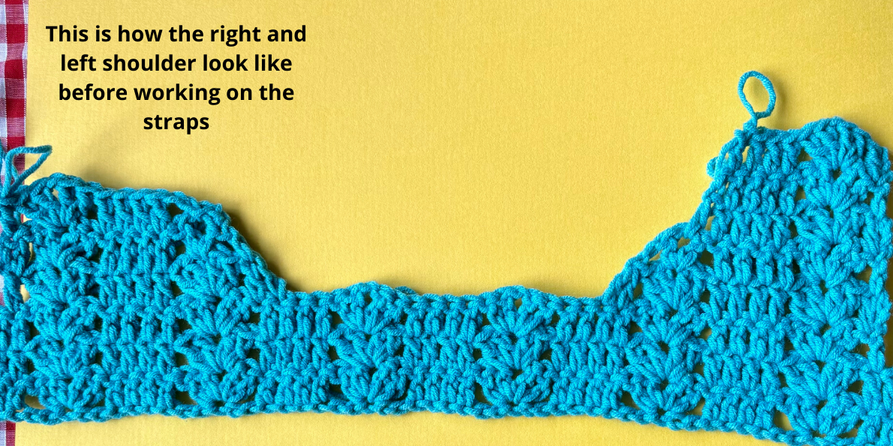
STRAPS
SHAPING LEFT SHOULDER
ONLY XS & S
Row 1: (Dec) 1 dc in 1st dc from row, SHELL in next ch-sp from previous SHELL, 1 dc in next 4 sts, SHELL in 1ch-sp from previous SHELL, 1 dc2tog, 2 ch and turn, leaving the remaining sts unworked.
Row 2: (Dec) V-st in next SHELL, 1 dc in next 4 dc, SHELL in next ch-sp from previous SHELL, 1 dc in last dc, 2 ch and turn.
Row 3: (Dec) 1 dc in 1st dc from row, SHELL in next ch-sp from previous SHELL, 1 dc in next 4 sts, 1 dc in next V-st, 2 ch and turn.
ONLY M & L
Row 1: (Dec) 1 dc in 1st dc from row, SHELL in next 1ch-sp from previous SHELL, [1 dc in next 4 sts, SHELL in 1ch-sp from previous SHELL] one time, 1 dc in next 2 dc, 1 dc2tog over next 2 dc, 2 ch and turn, leaving the remaining sts unworked.
Row 2: (Dec) Miss 1st st (this is the the st where the initial 2 ch is placed), 1 dc in next 2 dc, SHELL in next 1ch-sp from previous SHELL, [1 dc in next 4 sts, SHELL in 1ch-sp from previous SHELL] one time, 1 dc in last dc from row, 2 ch and turn.
Row 3: (Dec) 1 dc in 1st dc from row, SHELL in next 1ch-sp from previous SHELL, [1 dc in next 4 sts, SHELL in 1ch-sp from previous SHELL] one time, 1 dc2tog over last 2 dc, 2 ch and turn.
ONLY XL & XXL
Row 1: (Dec) 1 dc in 1st dc from row, SHELL in next ch-sp from previous SHELL, [1 dc in next 4 sts, SHELL in 1ch-sp from previous SHELL] twice, 1 dc in next 2 dc, 1 dc2tog over next 2 dc, 2 ch and turn, leaving the remaining sts unworked.
Row 2: (Dec) Miss 1st st (this is the the st where the initial 2 ch is placed), 1 dc in next 2 dc, SHELL in next 1ch-sp from previous SHELL, [1 dc in next 4 sts, SHELL in 1ch-sp from previous SHELL] twice, 1 dc in last dc from row, 2 ch and turn.
Row 3: (Dec) 1 dc in 1st dc from row, SHELL in next 1ch-sp from previous SHELL, [1 dc in next 4 sts, SHELL in 1ch-sp from previous SHELL] twice, 1 dc2tog over last 2 dc, 2 ch and turn.
ALL SIZES
Rows 4 to 7 (8, 9, 10, 11, 12): 1 dc in 1st dc from row, SHELL in next 1ch-sp from previous SHELL, [1 dc in next 4 sts, SHELL in 1ch-sp from previous SHELL] one time, 1 dc in last dc, 2 ch and turn.
Cut yarn at the end of Row 7 (8, 9, 10, 11, 12), leaving approx. 30 cm of thread to sew pieces together.
SHAPING RIGHT SHOULDER
ONLY XS & S
Starting from 1st dc2tog from Row 1 of left shoulder and the RS of your work facing you, count 2 (3) SHELLS and rejoin yarn in the 3rd dc immediately after the SHELL (See Pictures on page 11).
Row 1: (Dec) 2 ch (do not count as a st here and throughout) miss dc where the 2 ch begins, 1 dc in next dc, SHELL in next ch-sp from previous SHELL, 1 dc in next 4 sts, SHELL in ch-sp from previous SHELL, 1 dc in last dc, 2 ch and turn.
Row 2: (Dec) 1 dc in 1st dc from row, SHELL in next ch-sp from previous SHELL, 1 dc in next 4 sts, 1 dc in ch-sp from previous SHELL, 1 ch, 1 dc2tog over the same ch-sp and last dc of row, 1 ch and turn.
Row 3: (Dec) Sl st in next ch-sp from previous row, 2 ch, 1 dc in next 4 dc, SHELL in next ch-sp from previous SHELL, 1 dc in last dc, 2 ch and turn.
This sample is for size XS.
ONLY M & L
Starting from 1st dc2tog from Row 1 of left shoulder and the RS of your work facing you, count 4 (5) SHELLS and rejoin yarn in the dc immediately after the 4th Cluster SHELL (See Picture...).
Row 1: (Dec) 2 ch, 1 dc in next 3 dc, SHELL in next 1ch-sp from previous SHELL, [1 dc in next 4 sts, SHELL in 1ch-sp from previous SHELL] one time, 1 dc in last dc, 2 ch and turn.
Row 2: (Dec) 1 dc in 1st dc from row, SHELL in next 1ch-sp from previous SHELL, [1 dc in next 4 sts, SHELL in 1ch-sp from previous SHELL] one time, 1 dc in next dc, 1 dc2tog over last 2 dc, 2 ch and turn.
Row 3: (Dec) Miss 1st st (this is the the st where the initial 2 ch is placed), 1 dc in next dc, SHELL in next 1ch-sp from previous SHELL, [1 dc in next 4 sts, SHELL in 1ch-sp from previous SHELL] one time, 1 dc in last dc from row, 2 ch and turn.
ONLY XL & XXL
Starting from 1st dc2tog from Row 1 of left shoulder and the RS of your work facing you, count 4 (5) SHELLS and rejoin yarn in the dc immediately after the 4th (5th) SHELL.
Row 1: (Dec) 2 ch, 1 dc in next 3 dc, SHELL in next ch-sp from previous SHELL, [1 dc in next 4 sts, SHELL in 1ch-sp from previous SHELL] twice, 1 dc in last dc, 2 ch and turn.
Row 2: (Dec) 1 dc in 1st dc from row, SHELL in next ch-sp from previous SHELL, [1 dc in next 4 sts, SHELL in ch-sp from previous SHELL] twice, 1 dc in next dc, 1 dc2tog over last 2 dc, 2 ch and turn.
Row 3: (Dec) Miss 1st st (this is the the st where the initial 2 ch is placed), 1 dc in next dc, SHELL in next 1ch-sp from previous SHELL, [1 dc in next 4 sts, SHELL in ch-sp from previous SHELL] twice, 1 dc in last dc from row, 2 ch and turn.
ALL SIZES
Rows 4 to 7 (8, 9, 10, 11, 12): 1 dc in 1st dc from row, SHELL in next 1ch-sp from previous SHELL, [1 dc in next 4 sts, SHELL in 1ch-sp from previous SHELL] one time, 1 dc in last dc, 2 ch and turn.
Cut yarn at the end of Row 7 (8, 9, 10, 11, 12) leaving approx. 30 cm of thread to sew pieces together.
BACK PANEL
Using 5 mm hook and your favourite DK yarn
Chain 78
Rows 1 to 24: Repeat rows 1 to 24 for Front Panel.
Rows 25 to 33 (34, 35, 36, 37, 38): 1 dc in 1st dc from row, SHELL in next 1ch-sp from previous SHELL, [1 dc in next 4 sts, SHELL in 1ch-sp from previous SHELL] one time, 1 dc in last dc, 2 ch and turn.
At the end of row 33 (34, 35, 36, 37, 38), cut yarn and weave in ends.
SLEEVES RUFFLES
Notes on the sleeves:
The sleeves are worked directly onto the top and in the round. When placing the sts, you need to count each row from the body as a stitch, so you will be working 1 dc in a row or a V-st in the next one. You will be placing the new sts over the dc lying vertically but when working on the underarm, these dc will be lying vertically. You should place 1 dc in the seam of the shoulders.
With 5 mm crochet hook and colour A, rejoin yarn on the side seam of the underarm.
Rnd 1: Work 3 ch (count as 1st dc here and throughout), V- st in dc lying horizontally from 1st row of dec for the underarm, *1 dc in next available space, V-st in next row of dc* rep from * to * until the end of the row, sl st to 3rd ch from beg 3 ch. There are 12 (13, 14, 15, 16, 17) dc and 12 (13, 14, 15, 16, 17) Cluster V-sts in total.
Rnd 2: (Inc) 3 ch, SHELL in next V-st, *1 dc in next dc, SHELL in next V-st * repeat from * to * until the end of the rnd, sl st to 3rd ch from beg 3 ch.
Rnd 3: Repeat rnd 2.
Rnd 4: (Inc) 3 ch, 1 dc in same space, SHELL in ch-sp of next SHELL, * 2 dc in next dc, SHELL in ch-sp of next SHELL* repeat from * to * until the end of the rnd, sl st to 3rd ch from beg 3 ch.
Rnd 5: Repeat rnd 4.
Cut yarn and weave in ends.
Repeat these same steps on the other sleeve.
BOTTOM EDGE RUFFLES
Optional step:
Work a rnd of sc around the bottom edge of the top before working on the ruffles.
With 5 mm crochet hook and colour A, rejoin yarn on the side seam of your top.
Rnd 1: Work 3 ch (count as 1st dc here and throughout), miss 2 sp, SHELL in next sp, miss 2 sp, *1 dc in next sp, miss 2 sps, SHELL in next sp, miss 2 ch* repeat from * to * until the end of the rnd, sl st to 3rd ch from beg 3 ch.
Note on Rnd 1: In order to have enough sts to work the pattern in rnd 1, you might need to miss 1 st instead of two, twice.
Rnd 2: (Inc) 4 ch (count as 1st dc and 1 ch-sp), 1 dc in same sp, SHELL in ch-sp from next SHELL, *V-st in next dc, SHELL in 1ch-sp from next SHELL* rep from * to * until the end of the rnd, sl st to 3rd ch from beg 3 ch.
Rnd 3: (Inc) Move with a sl st to ch-sp from 1st V-st from previous rnd, SHELL in same sp, SHELL in next SHELL, *SHELL in next V-st, SHELL in next SHELL* repeat from * to * until the end of the rnd, sl st to 3rd ch from beg 3 ch.
Rnd 4: Repeat rnd 3.
Cut yarn and weave in ends.
NECKLINE
With RS of your work facing you, rejoin yarn on left shoulder seam to start working on the neckline of the top.
With 5 mm crochet hook and working in rnds.
Rnd 1: 1 ch (does not count as a st) 1 sc in same sp, 1 sc in next 2 sps, Picot st, *1 sc in next 3 sps, Picot st* rep from * to until the neckline is covered, sl st to 1st sc of rnd. Cut yarn and weave in ends.

That was fun!! Thank you so much for following my pattern and I hope we can stay connected. Here’s how:
Share your work on Instagram or Facebook: Tag @leonela.diy or and use #leonela.diy or #dublinbaycrochet to show us your work!
Leave a comment: Say hello and share your feedback below.
Pin this post: Save this to your Pinterest crochet board so you can easily find it again.
Invitation To Our Facebook Group
Come discuss crocheting granny square bag patterns and lots of other crochet projects and techniques in our Dublin Bay Crochet Facebook group. This is only a new group but I hope you join and have fun sharing your work with this beautiful crochet community :) Come join us here.
